Content
- Overview
- Technologies used
- Data validation process – overview
- Data validation framework – core components
- Example staging table
- Example data validation rules – introduction
- Validation rule definitions
- Validation stored procedures
- Code walk through
- Validation output
- Source code – download
- Deploying example validation process
- Executing example validation process
- Conclusions
- Related topics
1. Overview
The purpose of this second part of the three-part series on the SQL data validation framework is to demonstrate the capabilities of the framework by walking through an example data validation process. Additionally, the descriptions in this example cover salient features of the framework from implementation perspective. More information to understand the framework better is covered in the 3rd part (Details) of the three-part series on this framework.
2. Technologies used
Although the example framework was built using T-SQL in SQL Server 2016, it can easily be adapted to work with other RDBMS platforms such as Oracle and DB2 etc.
3. Data validation process – overview
Let me introduce you to the example data validation process that was built using the data validation framework.
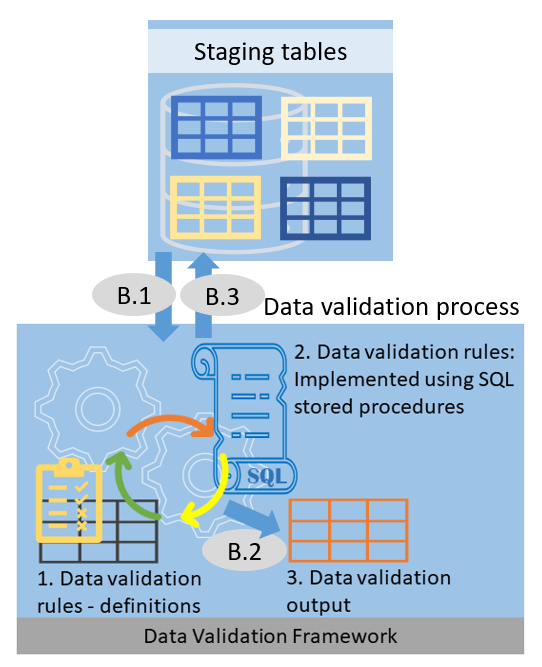
Referring to the figure 2.1, the data validation process comprises three broad steps as below:
- B.1 – applies data validation rules on data that’s sitting in staging
- B.2 – writes row IDs of the rows that broke business rules to Data validation output table
- B.3 – marks rows in staging tables as invalid if they broke critical business rules
4. Data validation framework -core components
Note: the description in this section is a bit more detailed than the one in the Overview article on the topic.
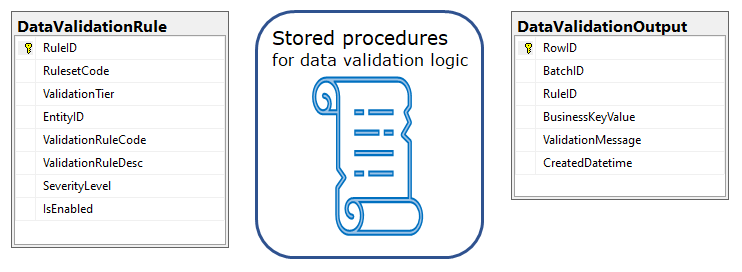
The data validation framework conceptually contains three sets of objects:
(i) Data validation rule definitions
A rule definition comprises of a label for validation rule, entity name that the rule is associated with etc. A detailed description follows shortly.
The actual implementation of rules itself is done in stored procedures.
(ii) A set of stored procedures to implement data validation rules
(iii) Data validation output
As part of generating output of the validation process, two actions are performed:
Output part 1: Log the row identifier (business key/surrogate key) along with the rule ID that it broke, to Data validation output table.
Output part 2: If the rule broken had a severity level of E (Error), then mark the corresponding row in staging table as invalid.
Let us see these primary components in more details using example data in the following sections.
5. Example staging tables
Say, we have three entities – namely, Customer, Account and Address, for which the data is fetched from a source system and at first loaded into staging tables. Then, we wanted to validate it before loading it to the destination.
The table design of the example staging entities looks as below:

Every staging table that’s being validated must satisfy the following minimum specification:
- Business Key or surrogate key – it is used in identifying records that broke validation rules. It can be a single column or composite key. Alternatively, a surrogate key.
- IsValid column or similar: it is marked as false (0) in the event a record broke any validation rule of severity E (Error).
For detailed information on the prerequisites, refer to the part 1 (Overview) of this blog post.
6. Example data validation rules – introduction
Note: This is just a cut down version of the same section that you will find in part 1 (Overview) of this blog post. .
To demonstrate the framework, let us consider a fictitious and simple data model of a data store with made up data validation rules:
Say, we have three entities in our data store: Customer, Account and Address.
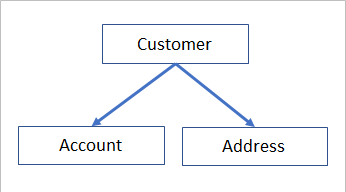
Example “Babushka” rule:
Put simply, imagining a data migration scenario, the example business rule was that: “load data of a customer and its linked accounts and addresses to destination, ONLY when all the related data of a customer have not broken any critical business rules. Additionally, a customer must have at least one account and one address”.
As you might have already realised, this example business rule is a kind of a Babushka type rule, where in many validation rules were contained in one big business rule.
Let us see in the following sections as to how this one broad business rule gets broken down into parts for implementation and segmented into validation tiers and arranged into sequential order of dependency for execution.
7. Validation rule definitions

As you can seen in the figure 2.5, there are three tables as below that collectively store rule definitions:
- DataValidationEntityList
- DataValidationBusinessKey
- DataValidationRule
These tables will be described below along with example data. The same data is going to be used later to demonstrate the data validation process.
7.1 DataValidationEntityList table
The very first step in configuring the data validation framework is to list staging table names in DataValidationEntityList table.
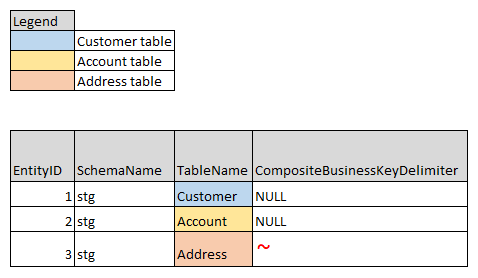
For this example, three staging tables – Customer, Account and Address – were listed.
Notice that the Address table has CompositeBusinessKeyDelimiter specified ( ‘~’ ) while the remaining two entities weren’t. Because, the Address table has multiple columns together as its business key.
7.2 DataValidationBusinessKey table
The DataValidationBusinessKey table contains just the business keys definitions.
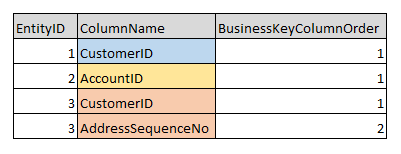
In this example, Customer table (Entity ID: 1) has just a single column (CustomerID) as business key. Similarly, Account table (Entity ID: 2) has AccountID as business key. However, Address table (Entity ID: 3) has composite business key (CustomerID + AddressSequenceNo) in that sequential order. The column order in the composite key definition is important because it is in this column order that the business key values in the validation output table will have to be generated.
7.3 DataValidationRule table
Having defined the entities and their business keys, the next step is to define validation rules itself.
The example “Babushka” business rule introduced earlier in this article has been broken down into multiple validation rules as in figure 2.8 and organised into validation tiers (0, 1, 2, 3) in the order of dependency. The expectation is that the rules in tier 0 will be executed first, followed by the rules in tier 1, tier 2, tier 3 and so on, in that sequential order.
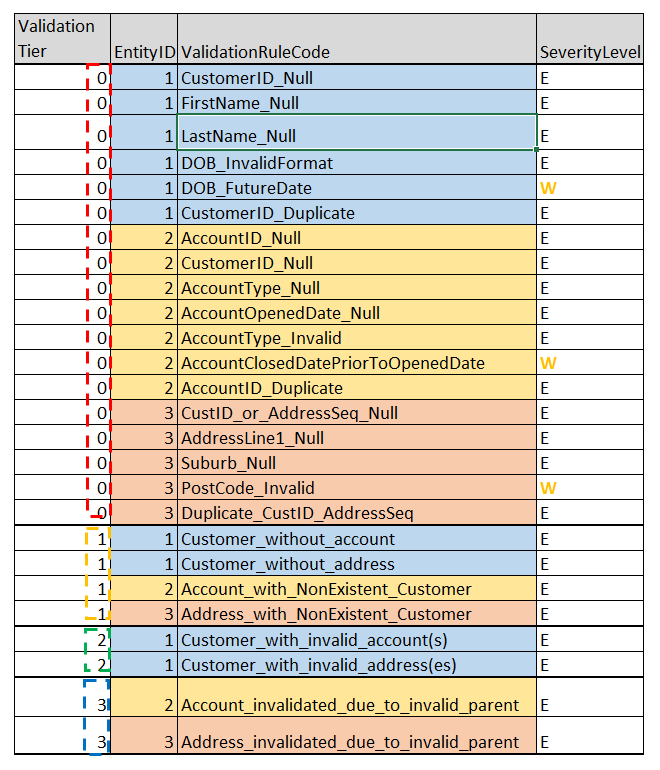
Note: The data entries in DataValidationRule as shown in figure 2.8 were abbreviated for clarity.
Also notice that some of the rules had a Severity level of W (Warning), while other rules were of severity level E (Error). As mentioned earlier, if a data row broke a validation rule of severity level E (Error), then such row in the staging table will be marked by data validation process as invalid (0), so that the ETL process can choose to exclude them from moving to destination.
8. Validation stored procedures
8.1 Background
While the definitions of validation rules are stored in DataValidationRule table, the rules itself are implemented in stored procedures.
The number of stored procedures that are required to implement validation rules depends on two factors:
- the number of entities validated by the validation process, and
- the number of validation tiers required to implement dependencies between rules.
In validation tier 0: there will be one stored procedure per entity to implement its tier 0 rules.
In validation tier 1 and higher: there will be one stored procedure per tier rather than per entity. All the rules of all the entities that belong to a particular tier (say, tier 1) go into a single stored procedure.
For the example validation rules introduced in the preceding sections, given that those rules were segmented into four tiers (tier 0, tier 1, tier 2, tier 3), there will be a total of six stored procedures as detailed below:
- At tier 0, three stored procedures – one per entity (customer, account, address)
- At tier 1 and higher, one stored procedure per tier
For our example data validation process, the example rules were divided across the below six stored procedures as below. The source code is downloadable at the link provided later in this article:
- usp_DataValidation_DemoRuleset_Tier0_stg_Customer
- usp_DataValidation_DemoRuleset_Tier0_stg_Account
- usp_DataValidation_DemoRuleset_Tier0_stg_Address
- usp_DataValidation_DemoRuleset_Tier01_Multi_Entity
- usp_DataValidation_DemoRuleset_Tier02_Multi_Entity
- usp_DataValidation_DemoRuleset_Tier03_Multi_Entity
Now, let us see as to which validation rule goes into which stored procedure.
As indicated earlier, it all depends on which entity and validation tier a rule belongs to.
The Figure 2.9 has the same list of example validation rules as introduced earlier, but now the list also contains stored procedure name that the rule is implemented in.
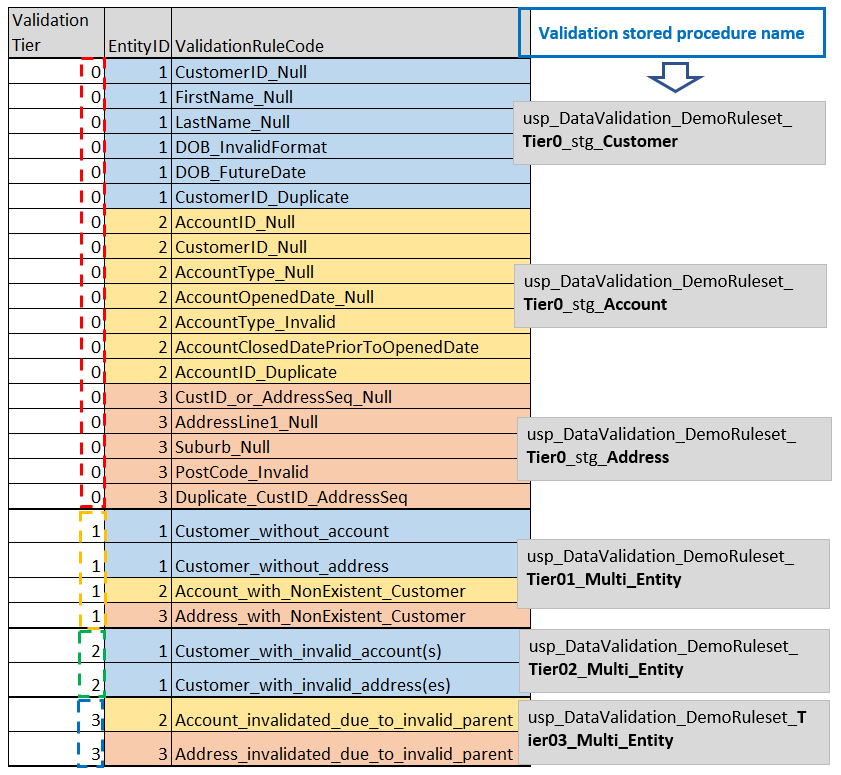
As you can see in the Figure 2.9, in case of validation tier 0 rules, there is one stored procedure per entity implementing all the tier 0 rules of that particular entity.
Whereas, in case of tier 1 and higher, a single stored procedure implements all the rules of that particular tier regardless of which entity that rule belongs to. For example, as can be seen in the figure 2.9, there were four tier 1 rules – two for Customer and 1 each for Account and Address entity. All these four rules were implemented in one stored procedure because they all belonged the same tier (tier 1 on this occasion).
8.2 Processing steps in validation stored procedures
The processing steps involved in implementing validation rules in each stored procedure are very similar.
Regardless of which tier a validation rule is implemented in, the processing steps contained in a stored procedure are as below:
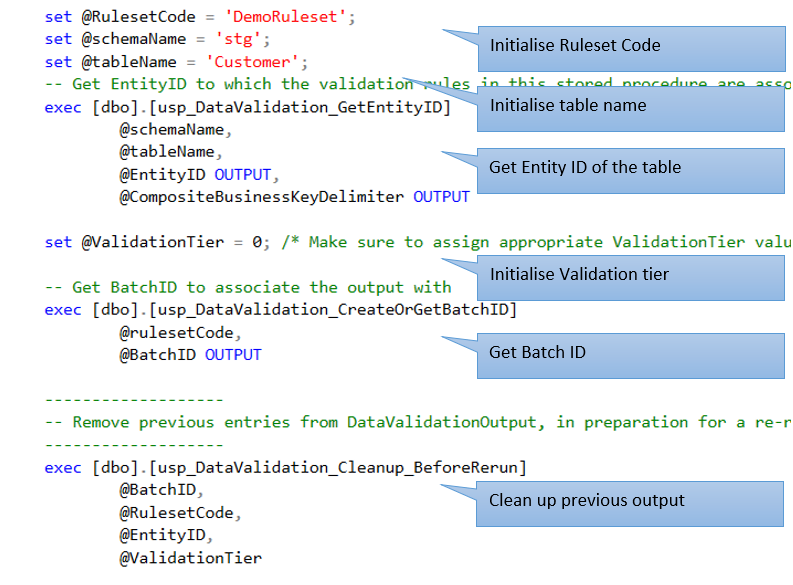
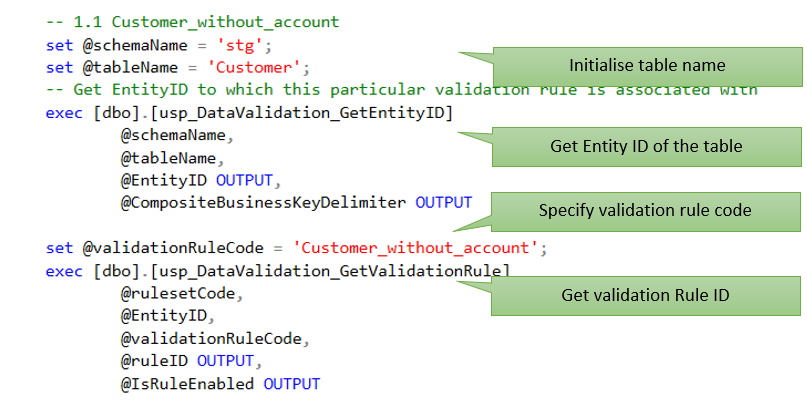
- Initialise RulesetCode – value as specified in DataValidationRule
- Initialise table name – entity name as specified in DataValidationEntityList
- Get Entity ID for the table being validated
- Initialise Validation tier – 0, 1, 2, 3 and so on.
- Get Batch ID – to represent output dataset
- Clean up output table – in preparation for a re-run with the same Batch ID
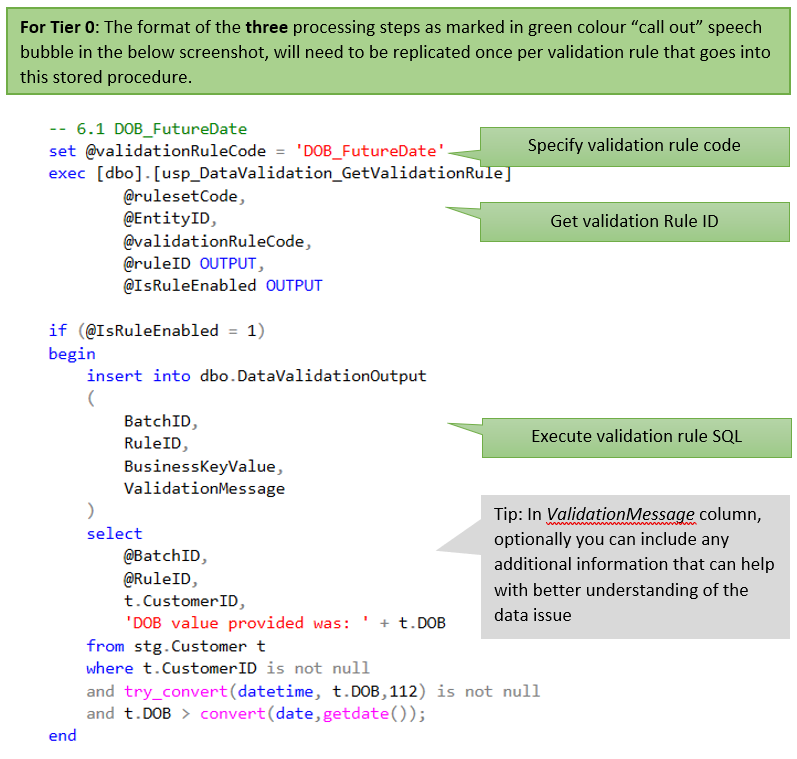
- Specify ValidationRuleCode – rule code as specified in DataValidationRule
- Get RuleID
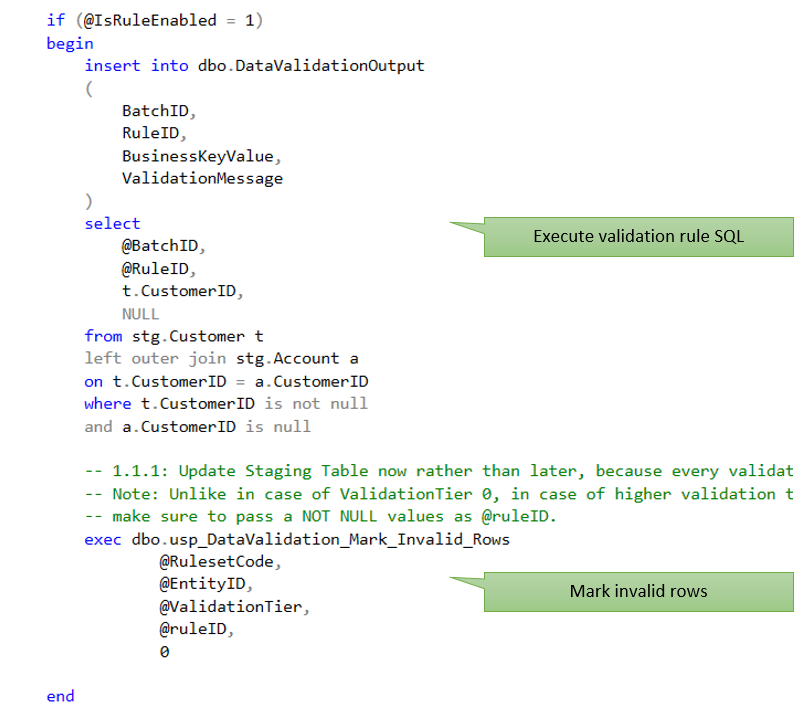
- Execute validation rule SQL
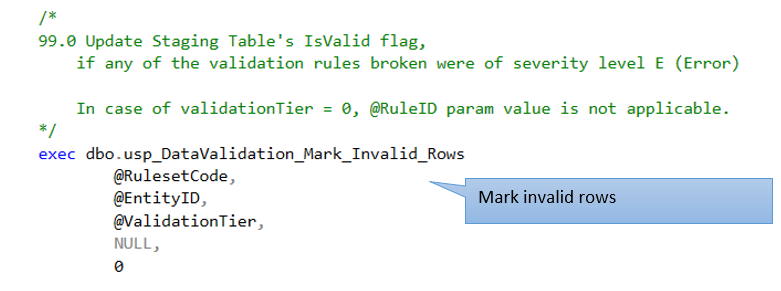
- Mark invalid rows in staging table – by setting its IsValid = false (0), if the row broke any validation rules of severity level E (Error)
However, the exact sequence of steps depends on which validation tier it is.
8.3 Difference in processing steps of tier 0 & (tier 1 and higher) stored procedures
A side-by-side comparison of the processing steps involved in tier 0 and (tier 1 and higher) stored procedures is as below:
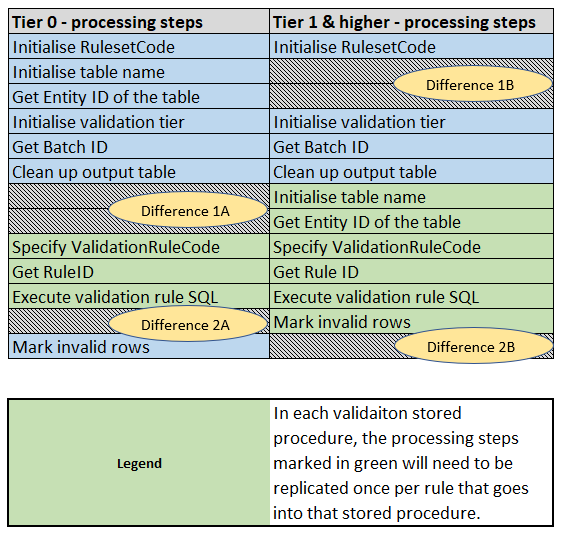
There are two main differences in processing steps between tier 0 and (tier 1 and higher):
Difference 1: The stage at which the two steps – Initialise table name and Get Entity ID of the table – are invoked
In the above diagram, this difference was marked as “Difference 1A” and “Difference 1B”
In case of tier 0 validation stored procedures, these two steps get invoked at the beginning of the stored procedure itself. Because it is the same entity that all the tier 0 rules in it belong to.
Whereas, in case of tier 1 and higher, multiple entities could have rules of the same tier implemented in a single stored procedure. For example, customer, account and address entities together have four tier 1 rules. These four tier 1 rules are implemented within a single stored procedure.
Difference 2: The stage at which the step – Mark invalid rows – is invoked
In the figure 2.10, this difference was marked as “Difference 2A” and “Difference 2B”
In case of tier 0 validation stored procedures, the step “Mark invalid rows” gets invoked only once, at the end of implementing all the rules for that entity in that stored procedure.
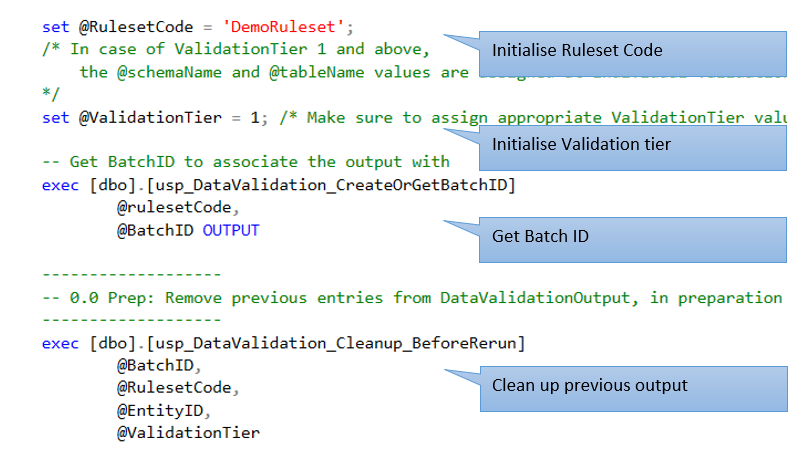
Whereas, in case of tier 1 and higher, the step “Mark invalid rows” will need to be invoked immediately after the implementation of each rule in that stored procedure. Because different rules in tier 1 and higher stored procedures could belong to different entities.
Also, note that the steps shown in green colour in figure 2.10 are the steps whose format will need to be replicated for each validation rule that’s implemented in that stored procedure. Say, there were four rules to be implemented in that stored procedure. Then the steps highlighted in green are to be replicated four times and each set of steps will have to be modified appropriately to reflect each of the four rules.
Having been introduced to the example validation rules and the steps that are involved in a validation stored procedure, now let us take a tour of one tier 0 and one tier 1 validation stored procedures to see how these rules were implemented.
9. Code walk through
9.1 Code walk through – Tier 0 validation stored procedure
Let us walk through the abbreviated version of stored procedure that implemented the tier 0 validation rules of Customer entity. For a working version of the stored procedure, refer to the source code.
The customer entity has six tier 0 validation rules all of which were implemented in a single stored procedure as shown in figure 2.11:

Note: the walk through will just cover one of the six tier 0 rules of customer entity for clarity.

9.2 Code walk through – Tier 1 validation stored procedure
Having seen an example tier 0 stored procedure in the preceding section, let us now take a tour of tier 1 stored procedure that implemented the tier 1 rules of all entities:
In this example validation process, all the three entities – customer, account, address – together have four tier 1 rules as in the below screenshot, that were implemented in a single stored procedure:

Like with the tour of tier 0 stored procedure, here in case of tier 1 as well, an abbreviated version of the stored procedure with just one rule will be used, for clarity.
Note: For a for a working version of the stored procedure, refer to the source code


10. Validation output
The output generated by the validation process has two parts:
- Validation output
- Updated IsValid flag in staging tables
10.1 Validation output options
In terms of extracting output, you’ll two options:
Option A: Standard format
You can extract a list of business keys of broken records along with the names of the rules they broke and their severity levels. However, it doesn’t contain a snapshot of the data values in the affected rows.
Example abbreviated output in standard format looks as below:

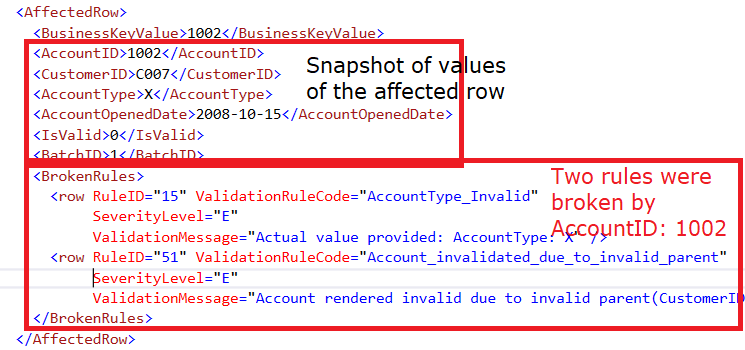
Option B: Detailed XML format
The XML output can also contain a snapshot of every column value of the affected rows, in addition to the standard output as in the option A. Example output in detailed XML format looks as below:
10.2 IsValid flag updated in staging tables
As part of the validation process, the IsValid flag in staging tables are marked as false (0) if any of those rows broke any validation rules of severity level E (Error).
An example screenshot of the Account table at the end of validation process looks as below:

Notice that in the example screenshot in figure 2.17, except for Account ID 1001, all other records have had their IsValid flag updated to false (0) because they broke rules of severity E (Error).
N.B: If you choose to exclude the invalid records from loading to destination table, then you’d need to include a filter (i.e. WHERE IsValid = 1) in your ETL queries that source data from these staging tables.
11. Source code – download
https://github.com/jpilli/SQLDataValidationFramework.git
Once the source code is downloaded, refer to the “00_01_ReadMe_SQLDataValidationFramework.txt” file for detailed instructions on how to deploy and run the example data validation process in your development environment.
The ReadMe file also contained instructions (Section 5) on how to inspect the example data validation output – both standard output as well as XML output
12. Deploying example validation process
In the downloaded source code, in the file (00_01_ReadMe_SQLDataValidationFramework.txt), refer to “Section 3: Deploying framework and example validation process”
13. Executing example validation process
In the downloaded source code, in the file (00_01_ReadMe_SQLDataValidationFramework.txt), refer to “Section 4: Execute example data validation process”
14. Conclusions
The data validation framework, based on which the example data validation process was built and demonstrated, can implement complex validation rules in a required sequential order to cater for dependencies between the rules.
Moreover, the information included in this walk through can be of practical interest, if you choose to build a validation process of your own, using this data validation framework.
15. Related topics
This article was the 2nd of the three-part series on SQL data validation framework. For other parts of this article including video presentations of the same, refer to the below links:

